Daily work
Transactions and the inbox
Getting spending into the app, and putting each charge on the right category.
In short
Every charge lands in one queue first, whichever way it arrived. Working that queue to empty is the daily habit the rest of the numbers depend on.
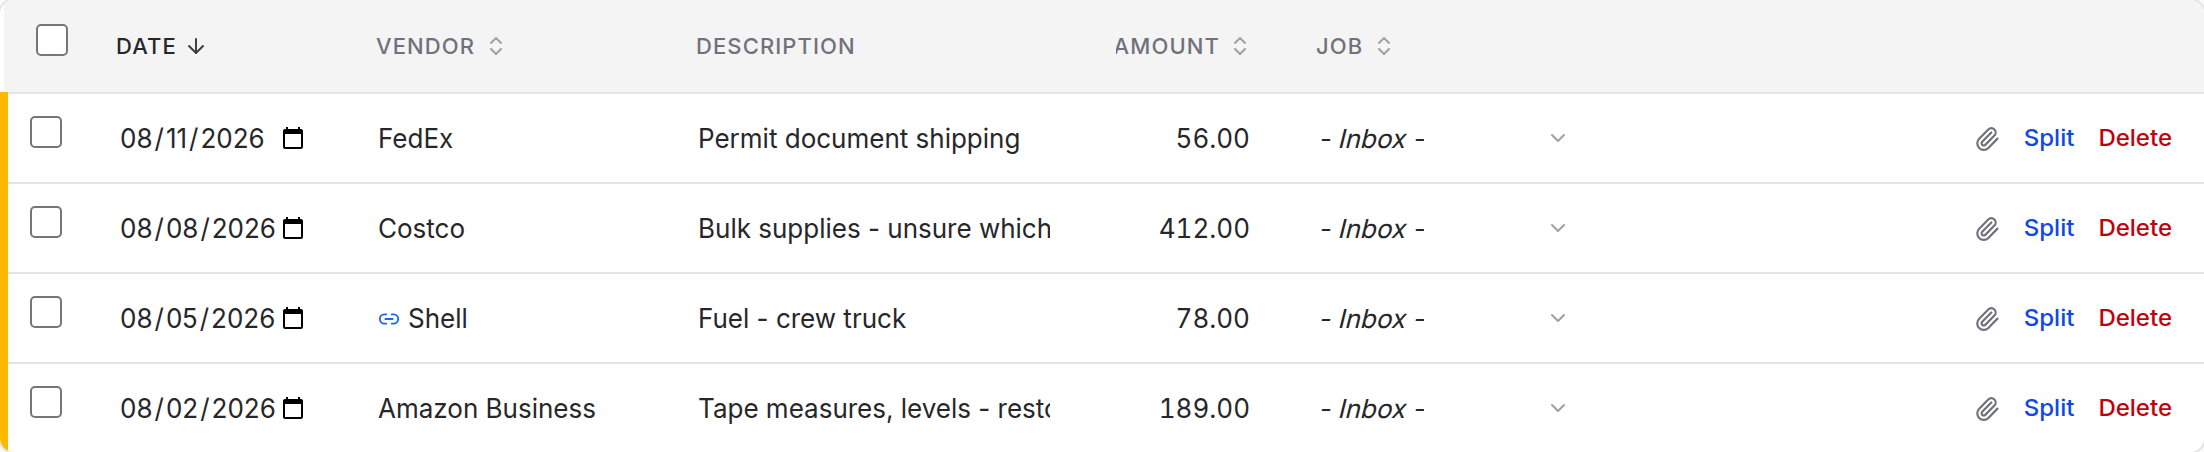
Everything you spend lands in the inbox first, whichever way it arrives. The inbox is a queue of charges that do not have a job yet, and working it down is the daily rhythm of the app.
1
2
Everything you spend lands here first.
Four ways in
- Bank feed. Connect an account from Settings and new charges arrive on
their own. This is the least work by a distance.
- File import. Upload a CSV or Excel export and map the columns once.
- Paste. Copy rows straight out of a spreadsheet and paste them in.
- By hand, for the cash job at the hardware store.
Working the queue
The inbox has three tabs. Inbox is charges with no job. Needs category is charges that have a job but no category yet. Recently assigned is the last 30 days of work you have already filed, so you can check yourself.
Picking a job commits it immediately, then offers that job's categories as an optional second step. If you walk away after picking the job, the charge is still filed against the job. It just shows up under Needs category.
With rows selected you can assign in bulk. Number keys 1 through 9 assign to the first nine categories without touching the mouse. Assignments are optimistic: the row leaves the list at once, with an Undo on the toast if you got it wrong.
Deleting a charge
Every transaction row has a Delete link at the right-hand end, on the inbox and on a job's Transactions tab in both the table and the spreadsheet view. In the spreadsheet view the link stays pinned at the right edge while the rest of the row scrolls. Deleting asks you to confirm, then shows an Undo on the toast; nothing is gone for good until that toast has passed.
In the spreadsheet view you can also select a range of rows and press ⌘⌫ (Ctrl+Backspace on Windows and Linux) to delete them together, with one confirmation and one Undo. Plain Delete or Backspace clears the selected cells instead, as in a spreadsheet.
A charge you have split into parts is deleted as a whole from its parent row, parts included, and Undo restores the whole group. A deposit you have booked as a client payment can't be undeleted from here: remove the payment on the job's Payments tab instead, and the charge returns to the inbox.
Moving a charge to another job
A charge filed to the wrong job is not stuck there. On the job's Transactions tab, tick the row (or several) and choose Move to job… on the bar that appears. For one row you can also open the ⋯ menu at the right-hand end and choose Move to job…; on a phone the link is Move to another job… under the category in the edit sheet.
Pick the job it belongs to, and optionally one of that job's categories. If you leave the category blank the charge lands under Needs category on the new job, because categories belong to a job and the old one no longer applies. Choose Inbox (no job) to send the charge back to the queue instead. Receipts and the vendor link travel with it.
Undo on the toast puts everything back where it was, original categories included. A charge you have split into parts moves part by part: open Split and change each part's job.
Rules
If a supplier always belongs to the same category, say so once. Rules live at Sync options and run as charges arrive, so a familiar supplier files itself. You can also apply a new rule to everything already in the inbox.
Rules can also ignore a vendor outright, which is how you keep a personal card or an inter-account transfer out of the job costs.
Vendors
Vendors are separate from categories, and the distinction matters. A vendor is who you paid. A category is what it was for. Keeping them apart means a supplier can appear across a dozen categories and still total correctly at tax time.
Each vendor carries a GL code, a tax ID and a 1099 flag. New charges match themselves to a known vendor as they arrive, and the 1099 report totals each flagged vendor by calendar year and marks anyone over the reporting threshold.
If you have history in the app already, Set up vendors from history reads back through your charges, groups the spellings that mean the same supplier, and lets you confirm them in one pass.
Splitting a charge
One supplier charge often covers more than one job. Choose ⋯ → Split on the row and divide it, with each part carrying its own amount, job and category.
The parts have to add up to the original. That is what keeps a split from quietly changing what you spent. The original row stays as a container, and the parts are what count toward each job.
Split by the receipt's lines
When the charge has a receipt that has been read, choose By receipt lines at the top of the split. Each line on the receipt gets an A, B, C button for the part it belongs to: leave the lumber in part A for one job, tap B on the paint for another. Tax, and anything else on the receipt that isn't a line, is shared between the parts in proportion, so the parts always add up to the charge to the cent. Each part is labelled with its own lines.
This only works when the lines can be trusted: they have to add up to the receipt's subtotal, and the receipt's total has to be this charge's amount. If a line was missed or the receipt belongs to a different charge, the split says so and you split by amount instead.
Important
A deposit from a client is not negative spending. Money coming in shows as a negative amount with a Credit badge. If it is a client payment, use Book payment on the row, or choose Book as client payment… at the top of its category picker, to record it against the job as a payment instead. Both work in the inbox and on a job's Transactions tab, in the table and the spreadsheet view. Filing a deposit as a category would understate what you have spent and overstate what is left. A genuine refund, such as returned material, still files to a category like any other charge.
Receipts
Drag a receipt onto any charge, or use the paperclip in the row. On a phone the upload button opens the camera, which is the point: photograph it at the counter and it is attached before you have left.
Each receipt is read after it's attached. Open the paperclip to see what was found: the store, the total and every line. If the receipt's total isn't the charge's amount, it says so, which usually means the receipt belongs to another charge. Read again retries a receipt that couldn't be read.
Where it goes
The app doesn't guess where a charge goes; you file it. To make that quick, the job you filed that store's last charge to comes first when you file one at a time, with a note saying so, and the rest of the list starts with the jobs you've filed to most recently. Nothing is filed without you.
Add a receipt from your phone or computer
Choose Add receipt at the top of the Inbox. On a phone it offers the camera, your photos and your files; on a computer it opens a file picker. Photos and PDFs both work, and you can pick several at once.
The app reads each receipt and tells you what happened. If exactly one charge from the few days around it has the same total, the receipt attaches itself. Otherwise it waits under Receipts to match, showing what was read.
Paid cash, or with a card that isn't connected? There's no charge to match, so choose Add as expense on the receipt. It creates the expense from what was read (you can correct any of it) with the receipt attached, ready to file to a job.
Email a receipt in
Your team has its own receipt address, shown in Settings under Email receipts in. Forward a supplier's emailed receipt to it, or email it a photo of a paper one. Save it as a contact on your phone and it takes seconds.
The app reads each receipt for the store, date and total. When exactly one charge from the few days around it has the same total, the receipt attaches itself and you have nothing to do. Everything else shows up at the top of the Inbox under Receipts to match, with what was read shown under the subject. When one charge is clearly the one (the same amount from the same store, the same amount a few days later, or the same store with a tip added), it says Probably that charge, and Attach attaches it. Otherwise choose Attach to… and pick the charge. The charges from the week around the receipt are listed first, best match first, and you can search for anything older. Dismiss removes anything that isn't a receipt.
A few rules keep your books safe:
- Receipts are only accepted from the email address you sign in with, or a teammate's. A
stranger who learns the address can't send files into your account.
- If the address ends up somewhere it shouldn't, an owner or admin can make a New address.
The old one stops working straight away.
- PDFs, JPEGs, PNGs and WebP images work. iPhone HEIC photos need converting to JPEG first
(most phones do this automatically when you email a photo).
- Emailing receipts in is part of Premium.